If you know very little about the kalimba, start here! We’ll introduce you to some important things to know about the kalimba, including how to tune it, how to fix a buzz, and what the different parts are called. This is your crash course on all things kalimba!
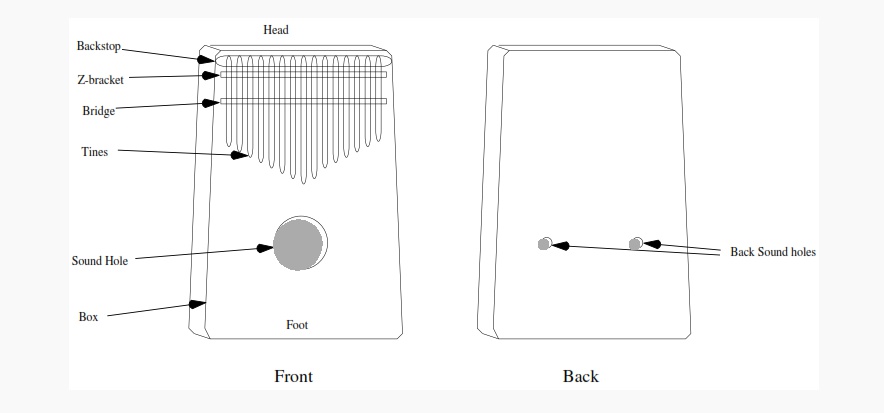
There are millions of people in the world who play the guitar and thousands of books have been written about playing the guitar, so there is considerable agreement on what to call the various parts of the guitar. Until very recently, there have been very few books about playing the kalimba, and people often don’t share the same vocabulary when referring to the various parts of the kalimba. I have selected the most popular and most descriptive nomenclature to indicate components in the diagrams below, which illustrate the anatomy of the kalimba.
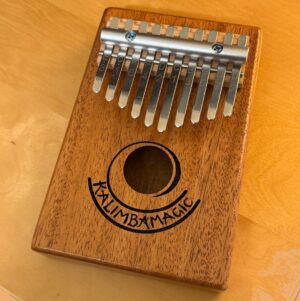
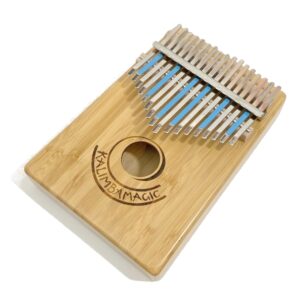
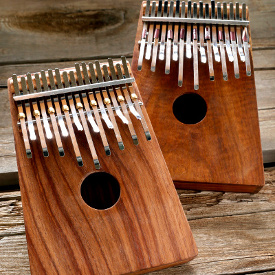
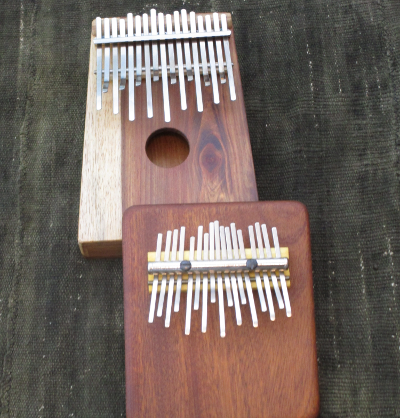 Some traditional African kalimbas were made on hollow resonant bodies, but most were mounted on a flat board. The box-mounted kalimbas are louder and you can get a great “wah-wah” effect by covering and uncovering the sound holes. The board-mounted kalimbas have a flatter “EQ curve”, and you can amplify them the traditional way: by putting them inside or atop a large, dried, hollowed out gourd for enhanced resonance. The Hugh Tracey kalimbas that are mounted on a board are called Celeste models.
 When you pluck a tine to produce a tone on the kalimba, you don’t have much subtle control over how the tine will vibrate.
You do, however, have some control over how the kalimba body will resonate. If you cover and uncover the sound hole, you will
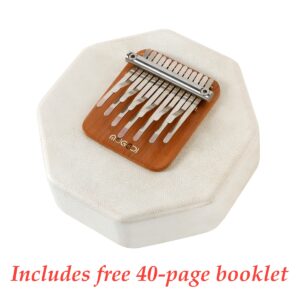
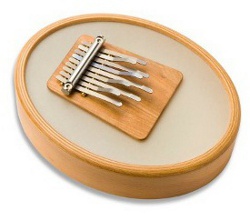
change the resonant properties of the box, producing the “wah wah” effect. The Sansula is a special type of kalimba that is mounted on a frame drum, and lifting and lowering on a flat playing surface
makes a really groovy special effect.
There are clever resonant chambers out there on other kalimbas that can give very interesting variations in tone as well as how long notes are sustained.
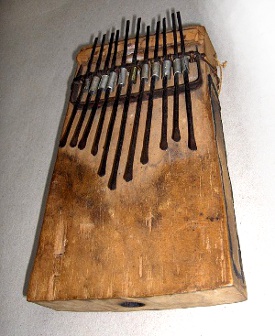
While Hugh Tracey was studying the dozens of traditional African kalimba note layouts, he found one, the likembe, (see photo), which used a regularly alternating left-right note layout to go up the scale – with the exception of the far right note, which is a lower drone (and is hence longer than its neighboring tines).
This instrument became the basis of the Hugh Tracey kalimba. Tracey borrowed its alternating note layout and used a western diatonic tuning (“Do Re Mi Fa So La Ti Do”), and came up with a new instrument with properties that allow western musicians to easily make music, where most of the traditional kalimbas were too exotic to be easily understood by the western ear.
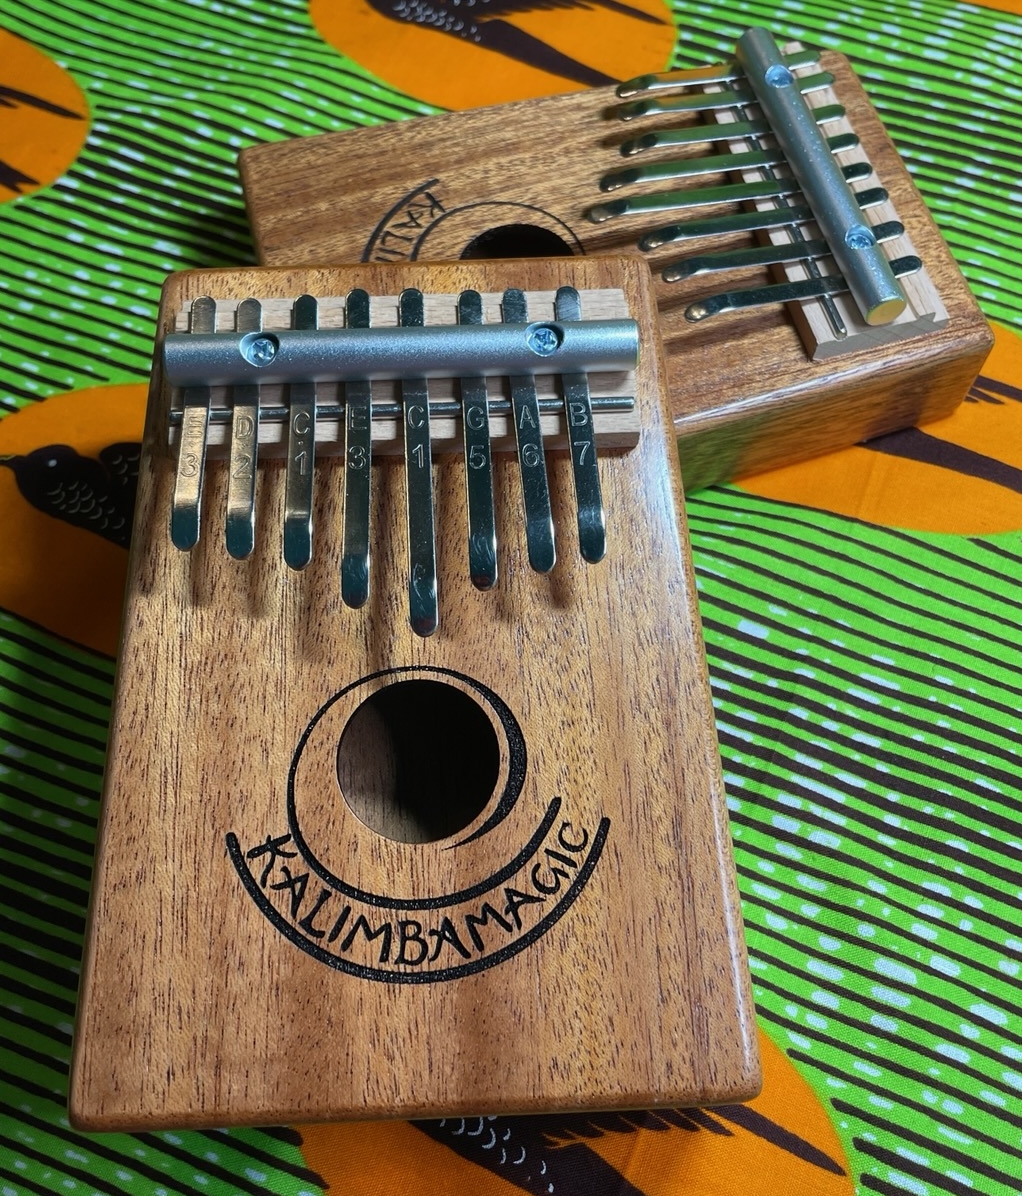
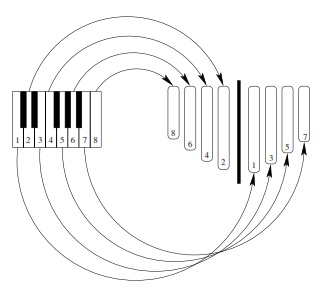 There are several fundamental consequences of the Hugh Tracey kalimba’s alternating note layout: a) scales are difficult, in that notes right next to each other in the scale are far apart (on opposite sides) on the kalimba, b) chords are easy in that two or three or four adjacent notes on the kalimba will always sound very nice together, c) if you know a melody, a simple harmony is to play both the melody tine and an adjacent tine simultaneously, and d) octaves will be on opposite sides, with one thumb low and the other high – look at the positions of notes numbered “1” and “8” in the image here.
While most of the kalimbas sold at Kalimba Magic use the alternating left-right note layout, not all do. The African-tuned karimba, the sansula, and the SaReGaMa-tuned karimbas are instruments that break this arrangement. Their idiosyncratic note layouts are often based on ancient tunings. In these tunings, the instrument has a certain body of musical patterns that it is recommending to you, almost as if the ancestors are leading the way, helping you out, or even singing with you.
There are several types of kalimbas we carry at Kalimba Magic, and each type might have one or several different possible tunings. Each kalimba that Kalimba Magic sells is in a particular tuning, and we ship each instrument along with its specific tuning diagram. After it has been played for several weeks or months, your kalimba will start to go out of tune. The tuning diagram will tell you what notes it needs to be tuned to.
You can find the standard tuning chart for any kalimba on that kalimba’s How to Play page. To learn about the mechanics of tuning a kalimba, visit the
How to Tune the Kalimba page.
A kalimba’s tuning will determine the universe of musical possibilities it will have. The standard, alternating note tunings are more “vanilla” and are better for general music creation. Different tunings will make some things easier and some things harder. A tuning can suggest a certain type of music for that kalimba, or certain kinds of emotion. We offer many alternative tunings – click the READ MORE button to find some of them.
Most people who have played kalimba for a month or more have come to know the buzzing that can occur on a few notes on the kalimba. You aren’t familiar with the buzz? Check out Taj Mahal playing on the Flip Wilson Show in 1973, which introduced many to the kalimba. These particular buzzes aren’t too bad as buzzes go. Listen for two cranky notes among the upper notes on both the left and right sides. When Taj plays the samba beat at about 1:00 in the video, listen for the buzz of the low G and A notes. These definitely detract from his otherwise stellar performance. (O, I could make that kalimba sing for Taj if I only had the chance. Keep on dreaming, Mark…)
One day the buzz will appear out of the blue – it is strange how that happens. While the Africans love the buzzing sound, and even go to great lengths to include shells or bottle caps on their kalimbas to make them buzz, most western ears don’t appreciate the buzzing, especially if it’s happening on only a few of the notes and the rest ring clear. Fortunately, there are several ways you can fix the buzzing.
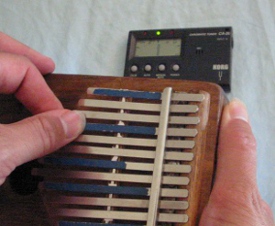
Often a buzz can be fixed by shifting the buzzy tine to the left or the right. If this doesn’t do it, try moving and pushing the tine down, grinding it a bit into the bridge, as you shift it. If this method works, the buzz will probably go away while the tine is shifted away from its original position but will probably return if the tine is back in its original position. So if you end up moving a tine pretty far from its original spot, you must then also move the neighboring tines to get them all evenly spaced again. If you try all this and still have buzz problems, go on to the “paper method”.
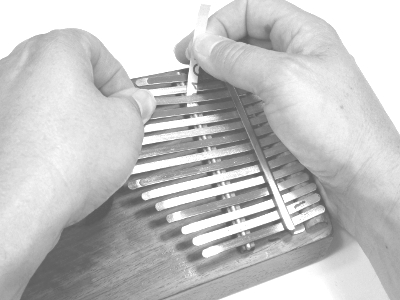
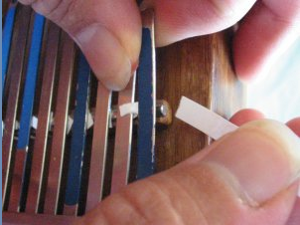 Cut a piece of regular office paper into a strip about 1/8 inch by 1 inch. Lift the buzzy tine up and off of the bridge rod, and slide the tip of your paper strip in between the tine and bridge rod. Lower the tine until it traps the paper, and then tear off the excess paper. This technique works very well for the lower 2/3 of the kalimba, but less well for the upper notes (with shorter tines), as it seems to compromise their sound too much.
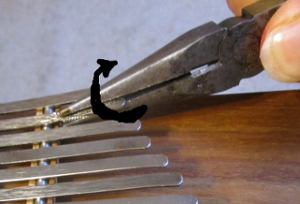 The backstop on the Hugh Tracey kalimba is a half round strip of wood, on which the tines rest at the head of the kalimba. The tines are under considerable tension here. They can compress part of the wood. If the tine is sitting partly on compressed and partly on uncompressed wood on the half round, this can result in a tine that is tilted a bit and consequently does not rest perfectly flat on the bridge. If the previous solutions have not done the trick, take a pliers and grasp the business end (the end you play) of the buzzy tine and torque the tine, hopefully in the opposite direction from where it currently rests (which sort of mashes some of the wood on the backstop) to try and get it closer to level. Pluck the tine and listen. If twisting the tine made the buzz worse, twist it the opposite direction, and do not be afraid to twist the tine more than once.
 A different way to help a buzzing tine lay flat and ring clear is to smooth the surface of the bridge, which is the fat, silver colored wire upon which the tines rest. Cut a little piece of fine sand paper (about 400 grit per inch), lift the buzzy tine, and slip the sandpaper between the tine and the bridge, sand-side down – don’t sand the tine. If you allow the tine to go down all the way, when you pull on the sandpaper, it will tear. Instead, lift the tine slightly such that it is still holding the sand paper in place. Then pull the sandpaper and it will grind away the imperfections of the bridge surface. After a few times, upgrade to the finest grit sand paper you can get – in my case, 1000 grit.
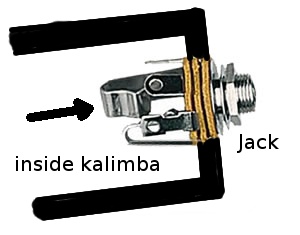
If your kalimba has a pickup, consider this rare situation: if there is one note that buzzes badly, and it stops buzzing when you insert a guitar cord plug into the jack, the buzz is due to a piece of the output jack inside the kalimba vibrating sympathetically with that one tine. Reach a finger inside the sound hole and, while you pluck that tine, touch the long thin piece of metal that is a part of the pickup. Does the buzzing stop when your finger touches this internal piece of metal? If it does, try pushing it around a bit and see if you can make the buzzing stop. You will be bending the metal a bit when you push it. When the buzzing stops, check to make sure the pickup still works. If this problem remains, or if you have compromised the pickup, return the kalimba to Kalimba Magic and, as long as the kalimba was purchased less than a year before, the pickup will be replaced free of charge.
Also, the hexagonal ring that screws onto the outside of the jack sometimes will come loose, and can rattle. This rattle will stop when you tighten the hexagonal ring. If it comes loose again, remove it, put a dab of crazy glue on the jack, and then put the hexagonal ring on again and tighten it, and this time it will be glued down for good.
If you have a buzz that you just can’t fix with any of these methods, you might want to consider
the Kalimba Doctor – if your kalimba is brand new, we’ll be embarrassed and fix it for free. (I suspect the buzzes sometimes develop from rough handling in shipping.)
The kalimba’s bi-directional note layout is a double-edged sword: it makes some things sound so sweet and nice, yet if you are trying to pick out a specific melody, it is easy to get frustrated by playing the wrong note. How often I have found myself on the wrong side of the kalimba! (Or: if you are looking for a note and failing, jump to the opposite side of the kalimba and look for it there.)
If you are getting frustrated with your kalimba, just remember these lovely and easy tricks for making cool sounds:
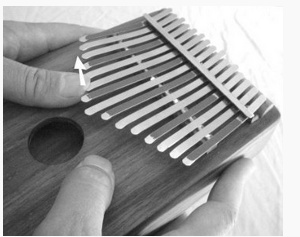 A glissando is what a harp does when you strum several strings one after the other, and I use that same word to describe strumming adjacent tines on the kalimba. On the kalimba, this usually sounds amazingly good because you are actually playing every other note in the scale, which is the recipe for making a chord. I find outward (upward) glissandos are easy and inward (downward) glissandos are difficult. Thumb nails help a lot, as the thumb flesh tends to get stuck as you are gliding along the tines. Touch your thumb nail to one tine and slide it outward over three or four tines, touching each with the thumb nail’s tip. Three adjacent tines will make a triad, four adjacent tines will make a 7th chord, and five adjacent tines will make a 9th chord.
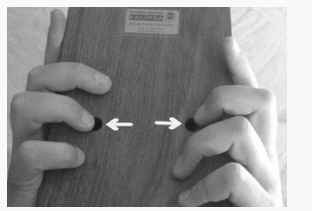 The vibrato effect. There are two sound holes on the back of the Hugh Tracey kalimbas, or on the sides of the Goshen box kalimbas and the Catania gourd kalimbas. When you cover and uncover these sound holes, you will get a vibrato effect, changing the tonal properties of the notes you are playing. As most people play the tines with their thumbs, this leaves the fingers free to simultaneously cover and uncover the back or side sound holes.
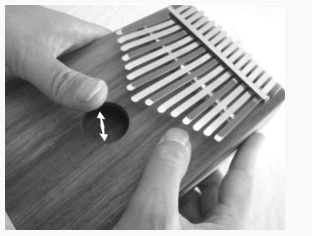 The “wah-wah” effect is made by covering and uncovering the front sound hole on a box- or gourd-mounted kalimba. As this hole is larger than the back or side holes, it is possible to get a deeper tonal modulation. When you cover the sound hole, experiment with how far you put your thumb in, and experiment with how much it effects each note. Typically, only three or four notes in the mid-range of your kalimba will be strongly affected by the wah-wah. My favorite thing to do is to play a mid-range glissando with one thumb and to cover and uncover the sound hole with the other thumb. Then trade thumbs and play a glissando on the other side. The wah-wah effect is increased when you also close and unclose the back or side sound holes simultaneously.
If you need more on the fundamentals, we offer a
Kalimba Fundamentals Book for the Alto Kalimba
as well as a
Kalimba Fundamentals Book for the Treble Kalimba
and now
Introduction to the 17-Note Kalimba in C
We also have resource pages for most of the kalimbas we sell. You can learn a lot more about these kalimbas:
If you aren’t interested in detailed instruction, read about
intuitive learning on the kalimba.
If you have any questions, feel free to contact us via the email form, or speak directly to Mark Holdaway at 520-488-7641. Contact Us

 Christmas in July 2025
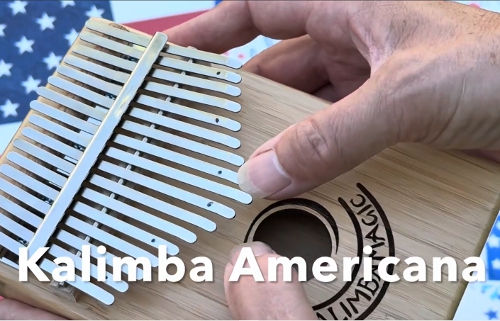 Patriotic and American Music for Kalimba