When you think of retuning, you may envision tuning hammers, tuning prongs, and pliers, and people pushing and grunting, but if you are serious about retuning your sansula, I have one little piece of information that will save you a lot of time and frustration. And we also hook you up with a lot of kalimba tuning resources!
Before I get too deep into the mechanics of retuning your sansula, just remember that under the “Kalimba Doctor” category in our shop, we offer a kalimba/sansula retuning service. If you mess it up badly, you can send it to us and we’ll send it back as good as we can make it – which is pretty good most of the time.
You can also order a new sansula in any of these tunings, or you can send your instrument to us for retuning before it is in pieces.
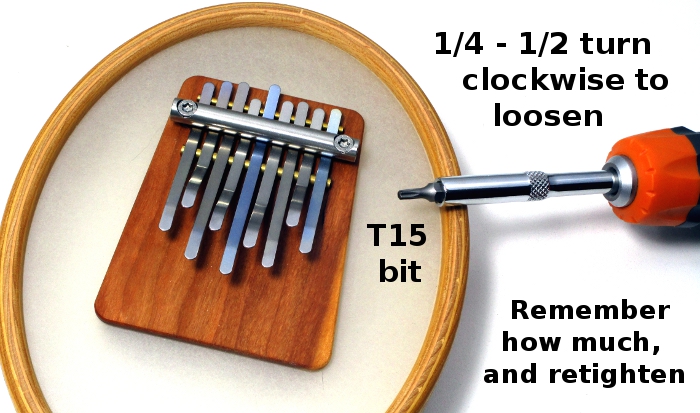
But if you are serious about retuning your sansula, there is one piece of hardware you will need: a screwdriver with a T15 driver head. This comes as one of about 50 interchangeable driver heads in the variety-pack screwdriver that I got from Home Depot for $8. The T15 head is a 6-pointed star, and it fits the sansula hardware perfectly.
Remember: your sansula membrane is delicate, and if you are rough with the retuning, you may damage the membrane. That is the main reason I started to loosen the bolts to retune a sansula: without loosening, there was a lot of friction on the tines and they were difficult to push, which required more force on the tine to retune, which can translate to stressing the membrane beyond its ability to recover.
On the other hand, don’t slip and pierce the membrane with your new screwdriver. Take care!
You only want to loosen the two bolts by a half turn. When you do, you will notice the tines will shift in orientation and lay flatter. It’s a good idea to practice this delicate operation a few times before you go on; just loosen and tighten to get the feel of it. If you turn much more than a half turn, the pressure bar will not hold the tines in place any longer and you will curse my name for getting you started on this adventure. (If the tines do fall off, follow this recipe: match the longest tine to the lowest note, then the second longest tine to the second lowest note. Additionally, you know where the bent tines go.
After loosening the bolts by a half turn, the tines will still be held in place and will not move on their own, but it should be easy for you to push them in or pull them out with your fingers or by pushing with something such as the butt end of a pen that has a hollow that can hold the tine a bit. If not, you might try loosening the bolts a little more.
Push and wriggle the tine in to shorten the vibrating length and make the tine go up in pitch. Pull it out a bit to increase the vibrating length and make the pitch lower. Remember, if you pull a tine out too far, it will no longer be held on to the kalimba.
Retuning is an iterative (repeating) operation. And the more you do it, generally the better you get at it. Lets say you want to raise the pitch and you push the tine in a bit, you should then check that tine’s pitch by comparing the tine to a reference pitch or by using an electronic tuner. You may be surprised at how little you changed the tine’s pitch! If so, push a little harder, and shorten the vibrating length more. After doing this a lot, you will develop excellent intuition on how far and how hard to push or pull to achieve the desired result. As a novice, just pay attention to how far the tine went and how much of a change you made in the pitch. If you go too far, go back a little bit. I find I can move smaller distances if I wriggle the tine left or right at the same time as moving it in or out a bit. If you do wriggle left and right, make sure the tine’s position is equidistant between its neighbors when you are done.
How close can you get a tine to being perfectly in tune? I find that by using an electronic tuner, I can get each tine tuned to better than 5 cents (i.e., 5 percent of a half step). When I am working hard on the tuning, my error level is about 1-2 cents. Most people can tolerate a tuning error of up to about 10 cents on a kalimba.
For the first tuning pass, I aim for about 10-15 cents accuracy. Then, I retighten the two bolts. If, during that first pass, I loosened them by more than half a turn, I have to remember that and retighten by the same net amount. The act of retightening the bolts will inevitably shift the tines somewhat, and they can go out of tune a bit. After retightening, go back and try to refine the tuning on each tine. Then you’re done.
This process takes me, with many years’ practice, under 5 minutes if I am just brushing up on the tuning, or about 10-15 minutes to change to another tuning.
We have links to our extensive tuning resources in the list below.
And remember this: even if you don’t think you want to try a radical new tuning, eventually your sansula will start to go out of tune, and you will probably want to readjust the tuning so it plays beautifully again. That process is the exact same thing as the process of a radical retuning, except the pushes and pulls will be smaller.
After you have successfully restored the original tuning a few times, you will likely feel differently about retuning. You may feel that you have the skills to embark on a bigger tuning adventure.
But there are simple retunings that won’t require a lot of effort. Read on in this tip series to find the perfect baby step sansula tuning. Imagine your feelings of pride and joy when you show your friends your very first, beautiful new sansula tuning, that you did all by yourself! Baby steps!


 Christmas in July 2025
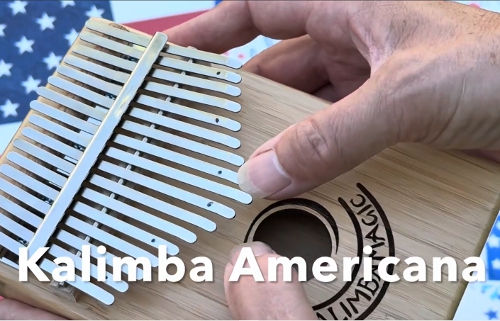 Patriotic and American Music for Kalimba