For the first 15 years I played kalimba, something about it confused me. Even though my Hugh Tracey Alto kalimba came in a box that said it was an African instrument, when I played the kalimba, the music that naturally came out was more like folk and rock and classical music. My kalimba played the music that I knew and loved and understood.
Americans get very little exposure to African music. For the last ten years, I have been slowly moving toward getting to know, and understanding, African music, with the goal of being able to (someday) play African music on my kalimba.
In this post, I show you step-by-step how to play a cool yet simple traditional African progression on the Alto kalimba.
The Alto kalimba is not really designed to play African music; it was designed by a westerner to appeal to the western ear and make it easy to play western music on it. Though it is possible to play the full traditional repertoire of African karimba music on the Alto, some of this music is not natural on this kalimba. I have made some progress playing nearly note-for-note arrangements of mbira dzavadzimu songs on the Alto kalimba, but they are generally quite difficult. What to do?
In this post, I take a different approach. I start from some of the organizing principles of traditional African music – the chord progression, the 12/8 time signature, and a simple easy-to-play thumb pattern. And then I create music based on these African concepts, but which is tailored specifically to the layout of the Alto kalimba.
The rest of this post comprises detailed instructions on playing my “Alto Mbira Cycle.” I must say that I enjoy playing this very much. It is generally not difficult to learn. There is a twist at the end, however, that may take some time to master.

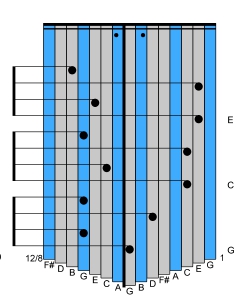
This is an elementary representation of the basic chord progression in traditional mbira music, but shown on Alto kalimba tablature. It is similar to the traditional song Kariga Mombe, which is often used as a first song when people learn mbira. Kariga Mombe is used as a first song because it clearly shows the chord progression, but the notes come slowly and the left and right thumbs always play together, making this music easy to play.
The two dots below the double horizontal lines at the top is a repeat sign. When you get to it, go back to the beginning (or go back to the previous “open repeat sign” with the dots above the horizontal lines). When you repeat, try to do so without any gap, making a seamless, continuous piece of music.
This exercise is actually much simpler than Kariga Mombe – no full chords are played, just two tines which are both the root note of each chord, played an octave apart. In other words, look at the very first two notes at the bottom of the tablature: the right plays a low G while the left plays a higher G.
If you alternate playing with your left and right thumbs, you can play much faster and get the music to flow beautifully. That is our goal. The music below is based on the octaves we just showed you, but we always lead with the right thumb and we add another note – the 5th of each chord, played on whichever side has the lower note in the octave pair. Most of the music clips below are learning exercises that will help you put the music together gradually.
Remember that you can apply this approach to any piece of music. Just look at the smallest bit of music that you can easily play correctly and practice those little bits, slowly at first, and faster as you are able to. Then stitch the little pieces together into larger and larger chunks of music. If this is too easy and you are bored, jump down to the last two pieces of music, and into the deep end.
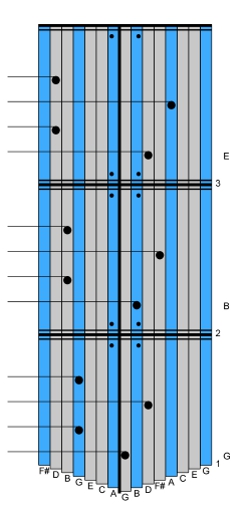
Three of the four notes in each measure are the same note name – G, B, or D, the root notes of the chords listed to the right. We also throw in the 5th of each chord, on the second note played by the right thumb in each measure (D is the 5th of G, F# is the 5th of B, and A is the 5th of D). In this particular music, we always lead with the right thumb, which simplifies things a great deal. Repeat the first measure over and over until you can easily play it. Then move on to the second measure and apply the same treatment. You can speed up the tempo as you get proficient. (The phrases are repeated multiple times here, as is done in traditional African music, and to help you really hear how they go.)
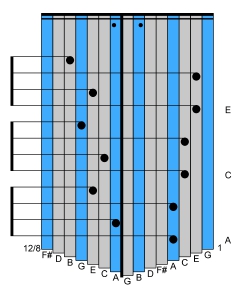
This is the first phrase of the cool faster pattern I am going to show you.
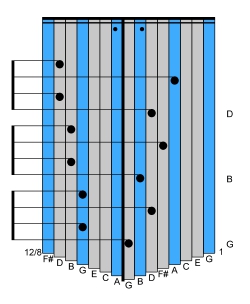
We have taken the notes from the previous exercise and put them all together without the repeats, and we have sped up the tempo by changing the notes from quarter notes to eighth notes.
Notice that the notes have a strictly alternating right-left pattern,
Here is the second phrase, broken up into small chunks for you to practice. Notice this: in measures 1 and 2, the left thumb plays high and plays the same note as the chord name, twice. Meanwhile, the right thumb plays both the low root and the 5th of the chord (G and D, or B and F#). In measure 3, the roles are reversed: we play the high E – the chord name – on the right thumb, twice. The left thumb plays the low E and the B, the root and 5th of the E chord.
Here we put the entire second phrase together, using the faster eighth notes.
Pay attention to this: the notes are organized in groups of four, beamed together with a vertical bar. Each group of four notes outlines a different chord, with the root note of each chord listed to the right. Each group of four notes reflects a similar structure: a low root note and the 5th of the chord on one side, and two high root notes on the other side. This pattern looks one way on the G and B groups, but the E group looks different: instead of starting on a low note as do the G and B groups, the E group starts on a high note.
It would have been possible to start the E group on the low E on the left side, but that would have required two left notes in a row – the final B note of the B group followed by the low E, which is also on the left side. You can play faster and more steadily with a strictly alternating right-left pattern, and to maintain that pattern, the E group (and also the C and A groups in the third and fourth phrases) needs to start high on the right instead of starting low on the left.
The third phrase is shown here.
For some perspective, you might expect to spend a day working on each phrase, and a day to put all four phrases together.
Here is the fourth phrase. The first phrase has the high notes always on the left thumb, and this phrase has the high notes always on the right thumb. The second and third phrases are intermediate steps in going from the first phrase to this last phrase.
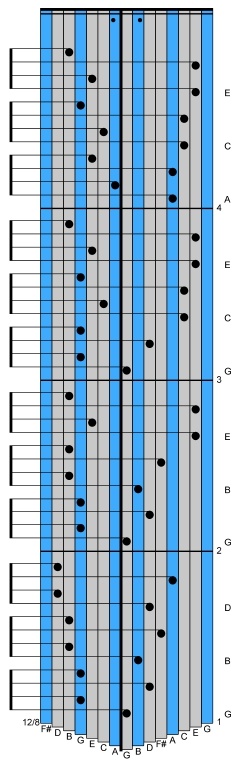
Here is the full cycle displaying the basic chord progression of African mbira music. This is the four phrases you just learned all glued together.
This music is stylized in a way to make it simple to play on the Alto kalimba. Notice that the music follows a strictly alternating right-left pattern throughout. This makes it easy to play this music at a fast tempo.
While the chord changes are easy to follow through each group of four notes, this music does not quite sound African yet. To get to Africa, we must make a subtle change in feeling, which has its roots in how we think about what we’re playing.
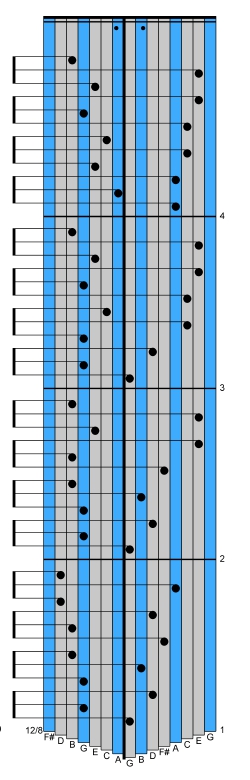
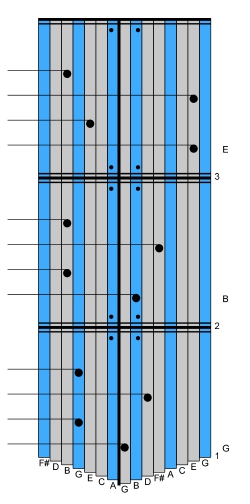
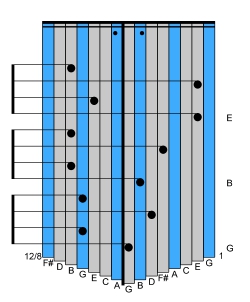
This tablature shows the exact same notes as the previous tab, but the notes have been beamed together in groups of three rather than in groups of four. Each chord covers a group of four notes, which is why I grouped them in fours in the previous example. We have removed the chord names, because we don’t want to emphasize the chord changes that occur every four notes. We want to flow and be free. This tablature tries to emphasize the three-note rhythmic units. To hear this rhythm, say “Kans-as-and Ar-kan-saw Mem-phis-and Tenn-e-see.” The naturally accented syllables of these words line up with the first note of each group of three notes.
And here is a really cool and complex and important thing about African music: the chord changes often come at one place, and the rhythmic accents come at a different place. To be clear, the first note of each measure lands on both a chord change and a rhythmic accent, but the rhythm and harmony dance around each other in a systematic way until they line up again at the start of the next measure.
While it might take you a few days to get to the point where you are playing all of these notes in the correct sequence, it might take you weeks, months, or years to feel and understand this subtle shift with the accents.
One way to speed up the process of feeling this music’s rhythmic/harmonic complexity is to walk while you play it. Let your footsteps fall on the first note of each set of three. Then you will build up tension between the chord changes and the rhythmic accents, but you will be able to hold that tension between your body and your mind. That tension eventually builds strength and stability into this music, just as the layers of wood whose grain runs in different directions provide strength and stability to the structure of plywood.
Walking and playing is a tremendous part of my personal creative process and I highly recommend it. When I walk and play music similar to this, I find that my body and mind create dozens of variations based on a simple starting point. The walking keeps the beat steady even when I am reaching for new, unknown bits of music. Try it yourself. For starters, try to vary the accents and try dropping a note or two here and there. Try accenting with the walking beat, as well as accenting against the walking beat. This is just the beginning of what you can do with traditional African music on the Alto kalimba.

 Christmas in July 2025
 Patriotic and American Music for Kalimba